How to Cut Led Lights Properly?
Posted by MARKETING LITONES

Can I cut my LED lights? and How? LED strips have become increasingly popular in recent years, thanks to their versatility and energy efficiency. However, if you want to make the most of your LED strips, you may need to cut them to fit specific areas or create unique shapes. In this blog, we'll take a look at how to cut LED strips safely and effectively, with some professional insights and cautions.
Before we begin, it's worth noting that not all LED strips are the same. Different types of LED strips may have different cutting methods or requirements. Therefore, it's essential to read the manufacturer's instructions before cutting your LED strips. That being said, here are some general guidelines to follow:
1.Plan your cuts
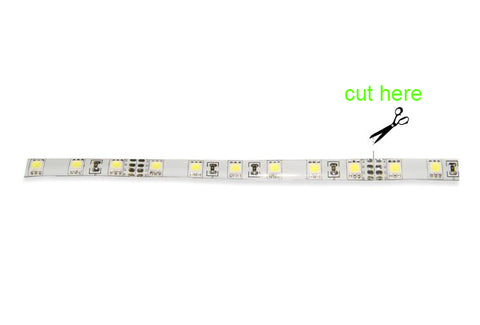
Before you start cutting your LED strip, it's important to plan your cuts carefully. You need to measure the length of the area you want to install the LED strips, and then add a few extra inches to accommodate the cuts. Remember that you can't just cut LED strips anywhere you want; there are usually designated cut points that you need to follow.
2.Cut the LED strip
Once you have planned your cuts, you can start cutting your LED strip. You should use a sharp pair of scissors or a box cutter to ensure a clean cut. However, you need to be careful not to cut the copper contacts on the LED strip, as this will damage the strip and render it unusable. Therefore, it's recommended that you cut the strip in small sections to avoid accidentally cutting the contacts. 
3.Seal the cut ends
After you have cut your LED strip, you need to seal the cut ends to prevent damage and moisture. There are different ways to do this, depending on the type of LED strip you have. Some LED strips come with a silicone coating that seals the ends automatically when cut. However, if your LED strip doesn't have this feature, you can use silicone sealant or heat shrink tubing to seal the ends.
4.Connect the cut ends
If you need to connect the cut ends of your LED strip to another strip or a power source, you need to use connectors. There are different types of connectors available, such as solderless connectors, soldered connectors, and screw-on connectors. The type of connector you use will depend on the type of LED strip and the application.
Now that we have covered the basic steps for cutting LED strips let's take a look at some professional insights and cautions:
5.Choose the right type of LED strip
As mentioned earlier, not all LED strips are the same, and different types may have different cutting methods and requirements. For example, some LED strips may have a higher voltage than others, requiring special connectors or cutting tools. Therefore, it's essential to choose the right type of LED strip for your application and follow the manufacturer's instructions carefully.

6.Avoid cutting through the copper contacts
As mentioned earlier, cutting through the copper contacts on your LED strip can damage the strip and render it unusable. Therefore, it's crucial to be careful when cutting the strip and avoid cutting through the contacts. You may also want to use a magnifying glass to help you see the contacts more clearly.
7.Use safety equipment
Cutting LED strips can be a hazardous activity, and you should always wear appropriate safety equipment to protect yourself. This may include safety glasses, gloves, and a face mask. You should also work in a well-ventilated area to avoid inhaling toxic fumes from the silicone sealant or heat shrink tubing.
8.Test the LED strip before installation
Before installing the LED strip, it's a good idea to test it to ensure that it's working correctly. You can do this by connecting the strip to a power source and checking that all the LEDs light up. If any LEDs are not working, you may need to check the cut ends of the strips and to make sure all those parts are connected properly.
